Pages

Friday 30 December 2016

What do you get the artist who has everything?

I'm very lucky to have a husband who has the incredible talent of being able to make pretty much anything. If it can be thought up and the materials sourced, he can make it and believe me, I've asked him to make some unusual things since I've known him. Most of my degree was sponsored by his ability to make my vision become a reality and for many of my classmates too - if you meet him, ask him about the skateboard for a performing snail.
This Christmas though, he has surpassed himself. About a year ago he took an old cigar box and turned it in to a watercolour box to hold my Daniel Smith watercolour paints (which I squeeze out in to empty half pans) and a few weeks ago we discussed 'upgrading' this idea in to something that will hold every colour I own.
Let me point out, this is no mean task as I own MANY tubes of watercolour, but he rose to the challenge and not only hand crafted a box to fit 266 full pans (yep, you read that right) but it also holds my new ceramic palette and my folding water pot too.


It is a thing of absolute joy.
The box folds out flat on my drawing board without tipping, it houses the trays in the lid so that I can work from them while using my palette and waterpot, and it even has a small 'travel' tray so that I can decant out the colours that I am using that day and have seperate from the main box if I so choose.
Of course, I have completely lost my head over it and have now started labelling all the pans with the pigment information so that I can compare make against make...my obsessive tendancies are just loving every minute.


Just in case you wondered, I do know how lucky I am and I promise that I don't take it for granted that I have this amazing man in my life. Question 'What do you get the artist who has everything?' Answer: A bespoke watercolour box which she will always treasure.

Sunday 23 October 2016

Amazing what a holiday can do for you!


A holiday with my husband and I return to my studio full of inspiration! It's not necessarily that this cobweb painting was something I witnessed while I was away (more of those paintings to come) it's just that a week of beautiful countryside, reading and quality time with my family has freed up my head.
This painting (w.i.p. above) was created while the lovely Wyndham Art Group visited my studio this week. A small group of very enthusiastic painters, they have a huge sense of fun and vitality and wanted to come along and paint with me for the day. Oh, such a chore!
Together we created this piece, concentrating on using a ruling pen with masking fluid for precision blocking out and combined it with very loose, dark washes to show off the pale areas when the making was removed. There were many in the group who really hadn't mastered masking (try saying that quickly) and it was a pleasure to help them overcome their problems and unleash them on the possibilities that masking out can reveal.
Below you will see a close up of where the masking was used for the cobweb to give a sense of a stained glass window when combined with my favourite Daniel Smith watercolours in Cobalt Violet, Green Gold, Prussian Blue and Lamp Black.
Do you enjoy masking or is it a technique that has eluded you so far? Let me know and I'll help where I can, have a great week everyone.


Saturday 1 October 2016

A quick word about gouache

The more I use gouache, the more I love it.
When I originally taught myself how to paint, it was gouache that I first used as I loved the consistency and how flat I could get the colour to sit on the paper - I was heavily in to celtic knotwork at the time. Moving on to watercolours and leaving it behind, I've only just recently re-discovered how versatile a medium it is, particularly for inclusion in mixed media pieces.
Today at the studio we executed a foxglove painting and I'm not overly thrilled with mine, I definitely need to spend more time observing the shape of a foxglove 'trumpet'. However, we did add a bee in to our pieces and around the room, many people were pleased at how their bee wings came out, just with the simplest touch of gouache. Masking fluid would have been too hard and painting around them or glazing over the top may have been too big a stretch for some abilities so a little gouache and hey presto! a semi-transparent bee wing appears on the surface.
If you haven't ever had a chance to have an experiment with the medium, I urge you to try it out. I use Permanent White for highlights and it is quite versatile when mixed with watercolours or Brusho. Let me know how you get on and you are welcome to email me your paintings, or share them on Facebook. Have Fun!

Thursday 22 September 2016

I'd like to thank...

...is how every Oscar acceptance speech starts and we watch them, wondering how much gushing we are going to have to endure. However, it is worth thinking about those people who help us out when we have a goal which we are striving for, so this is the art equivalent of my Oscar speech. This week, I've been booking lots of things in to my diary for 2017 (all exciting blog posts to come) and I have realised that without significant people in my life, there is no way that I would be able to achieve my dreams. Do the rest of you out in art land feel the same? There are my supportive students, organisations like the Society for All Artists who work hard to promote me and my work and my assistant Jasmine, but these are all work related. How about friends, family and partners? All of them constantly beavering away in the background, helping out and making sacrifices just so I can do what I do.
My parents are just brilliant, even at the grand old age of 42, my mum is still my sounding board for ideas and problems and my dad will still drive me to events if I'm likely to be tired on the way back. Then of course there's my husband, who I don't think really understood what it would be like to live with a constantly driven, work obsessed artist but does it without ever moaning and is always the first to tell me to go for something.
So to all of you, my heartfelt thanks and gratitude and to my husband (who may occasionally forget what I look like) you are just the best and although I know you will hate it, here is you taking part in one of my workshops!


Sunday 4 September 2016


A lovely workshop at the studio today, with a full house to kick off the autumn term. A different way of painting for me, mixing up the traditional order of laying down colours in order to 'let go' of it a little more.
We started with a loose, watery wash of colour on the background after a great deal of discussion about paper and surfaces, playing with salt and clingfilm to suit our tastes. Only when this was dry did we start constructing our subject matter with a few loose pencil lines, adding a second layer of washes over this to give a vague sense of where our colour was going to occur. To spice things up at this stage, we included metallics in the form of inks or powders to our washes, only then pulling it together with darks to give the definition.
This is always a tricky class to teach as some gravitate to this type of painting and others take a little longer to get used to letting go of the precision. I think though, that everyone agreed that in order for the pieces to be successful, they needed to adopt the 'less is more' principle - easy to say and not so easy to do! Have any of you out there ever experienced this? Let me know won't you...

Sunday 28 August 2016

The only useful blog....


...is one that the artist remembers to update!
As usual, my life at the studio has been taken over with teaching and planning the 2017 classes and therefore, this blog has become seriously neglected. A small summer spring clean of admin should help now though and I will attempt to pass on more information through this site.
So have you all had an artistic summer? What have you all been up to? Let me know what artistic discoveries or experiments you have found won't you? I always love to hear from you as sending this blog out in to the ether is surreal at the best of times.
Personally, I have been experimenting with fabrics and trying to introduce new colours in to my palette rather than falling back on the old favourites. I'll let you know how I get on in due course. In the meantime, my 2017 class brochure launches on the 1st September and I am looking forward to chatting to you all about it.
Until we read again......

Saturday 9 April 2016

My talented husband

To coincide with my Highcliffe exhibition, today we ran a workshop at the studio showing how my beautiful picture frames are made by my husband Richard. When we first met I taught him how to picture frame, although not much tuition was needed as he was already very practical and this has now grown as part of the many services we offer at my studio.
What he hadn't allowed for, was that one day I might ask him to pass that knowledge on to anyone who might be interested and so this workshop was born.


It was important today to pass on the amount of work that goes in to picture framing and the hours that it takes to compliment the art work. Richard goes further by also reclaiming wood for the mouldings as I prefer natural woods such as oak and cherry, and profiles them in to lengths that can be used to show off the subjects that I choose to paint.

I don't think people were prepared for the amount of accurate maths that's involved either, as Richard showed how to calculate the dimensions of a mount and cut clean bevels on our mount cutter before demonstrating how to prepare work for a browser or to fit in to a ready made frame.


However, everyone went home with greater knowledge of what is required to finish off the hard work that goes in to creating a work of art and many were able to cut their own mounts, impressed at how much better their paintings looked after framing.
I think Richard surprised himself a little too, it wasn't obvious that he hadn't taught before and many of the class remarked on how he shared his knowledge with ease. Now to teach him how to paint...

Thursday 31 March 2016

Waiting for the Postman


My solo exhibition went up yesterday at Highcliffe Castle, if you are local to me then may I suggest you call in if you get a moment? For no other reason than it is the most beautiful building with a very interesting history, including once being the home of Mr. Selfridge! If you happen to be somewhere else on our planet, look it up as you will be fascinated by the story that it has to tell and therefore I feel very honoured to be asked to exhibit there.
I had promised many of you that I would blog during the duration of the show and let you in on a few of the stories associated with my work. I thought I would start today with this piece called 'Waiting for the Postman' and depicts my two Jack Russells (Troy on the left and Riley on the right) in their morning sentry duty at my front window, guarding me from the horrors of the man who dares to bring my correspondence to the door. They can't understand why I'm so ungrateful, they save me from this terror on a daily basis and all I do in return is shut them in the lounge......
The painting is mixed media and includes a selection of stamps used as collage items in the background. My Dad is an avid philatelist so I asked him for a few worthless examples to help to tell the story, there is even a stamp with a squirrel on it (top right) just to torment my boys even more. The main media is watercolour but I have included a little powdered ink and pastel to help with the fur over some of the collage materials that I laid down at the start of the piece. The painting is for sale and if you would like any more information, please feel free to get in touch for a no obligation chat via my email alisoncboard@gmail.com

Monday 22 February 2016

Probably Peter

Last week I was lucky enough to be invited to the Wyndham Art Society to give a workshop. They are one of my favourite groups to visit, so welcoming and ready to have fun, they are a pleasure to teach. A few emails backwards and forwards before my arrival gave me the information that they would like to have a go at a horse head portrait - no mean task for those who haven't had a go before! So I arrived at their regular meeting spot, armed with Pete, my husband's old showjumping ride, a wonderful, if not slightly temperamental Dutch Warmblood who is a handsome old goat and worth painting. I always have lots of stories to tell about Pete, mostly concerning our love/hate relationship but certainly that he is a champion and when he wants to win, there isn't much that will stop him.
I promised the lovely people at Wyndham that I would give a brief over view via this blog of what we tackled, both to remind them and to help out any members that missed the session.
Probably Peter will be going in my exhibition at Highcliffe castle at the end of March if you would like to see him all finished, but until then, I hope that this will suffice.....

1. We drew Pete out on to good quality watercolour paper, first using Tracedown from a photograph I had taken and then worked back in to our pencil drawings to give as much information as we could. Using pink Frisk masking fluid, we decided where all our highlights were going to sit and reserved them accordingly. Using sketching pens in black, brown and grey, we drew back over the masking fluid when it was dry to start to make Pete 'pop' off the page.


2. Using cold colours to complement Pete's orange/brown tones, we dropped in a vignette background and used this opportunity to add a little Brusho to the composition which would provide us with texture and movement in the final composition.


3. Using colours loosely, we applied watercolour, firstly all over Pete and then concentrating on shadows and features.


4. After removing the masking fluid, we were able to balance out the bright highlights with darker shadows and many participants went back in with ink or gouache to put the finishing touches in to their 'Petes'.


So here is Pete, looking very pleased with himself - a fitting portrait of a horse that makes me laugh and swear in equal measure. If you have any horsey portraits that you would like to share, email me at alisoncboard@gmail.com, I'd love to see them!


Sunday 7 February 2016

Cow's eyes and when to call it quits

I held a workshop at my studio yesterday for the participants to execute an animal portrait, I chose a cow from a photograph I had taken on the farm a couple of years ago. I have painted cows many times before and felt confident that this one was not going to pose any problems....mmm, funny how even a slight change in the order of a painting can throw you off. Previously, I have always used a side on view of the animal and this one was very obviously straight to camera - how much of a difference would this make? It turns out, quite a lot, so much so, that I've delayed putting out this post as I've been staring at this cow painting for the last 24 hours trying to decide if I like it or not. In fact, the jury is still out but this is a really good lesson (trust me to put a positive spin on it) in that, sometimes, you've just got to quit and move on. Read on with me and I'll explain:

  
1. I sketched out the cow on to Saunders Waterford paper, in a normal pencil, leaving lots of paper around the animal for a vignette.


2. I added two different mediums to the piece - Pebeo modelling paste for texture and white gesso to repel some of the colour when it's applied. You can see here that I used a palette knife to make 'sticky' marks to represent hair.


3. I added masking fluid to the hairs on the perimeter of her paying particular attention to the nose and whiskers.


 4. Using two of my favourite watercolour paints - Amethyst and Sleeping Beauty Turquoise - I popped in a soft background, wet in to wet and rag rolled it with kitchen towel to diffuse the colour.


5. I then worked on the cow 'all in one', in other words, using strong colour (Hematite) together with Cerulean and a little Quinacridone Rose in varying strengths to build up the shadows, tones and features. After removing the masking fluid with a Maskaway and stepping back from it, I started to use Inktense pencils and a little gouache to build up the parts of the study that were important.


So now you have reached my dilemma, my students all pushed their pieces much further along the road than I had taken mine and we had some excellent work produced. Some had never tackled an animal before, some hadn't explored the wonderful world of mixed media and all of us had a wonderfully fun day. Usually after class I complete a piece (I rarely do it in a class due to the participants pieces being more important than mine, I had shown them everything they needed to know to finish) but yesterday I just wasn't feeling it. Should I push through the wall? Should I make myself diligently work at it? Or should I practise what I preach and just 'step away from the cow' and leave on the easel until another day?
I've opted for the latter. I'm not a machine, I'd rather finish it at another time when it is calling to me to do so, or learn from it and try again another time. Lots of students ask me 'How do I know when a painting is finished?' and there are too many answers depending on the circumstances but this time I will pop her on the easel, turn off the lights in the studio and have a look at her another time. Happy Painting everyone...

Saturday 9 January 2016

Venice in Mixed Media and Collage

Lovely workshop at the studio today, enthusiastic students and a great buzz in the room. We worked on quite a simple project so I thought I would share it with you and give you a little insight. I have been lucky enough to visit Venice many times and often admire the windows that I see along the canals, it was these that gave us the inspiration today and I have broken down the project in to steps for you to follow but put your own spin on it, and email me if you would like to share your masterpiece!

1. Choose your subject matter and where it is going to be roughly placed on the paper. You are going to be laying down collage materials before drawing out your composition, therefore it will be helpful to have a rough idea of where things are going to sit on the page. Here is the photograph that I worked from today:
2. Today I chose to use tissue paper for my collage material, glued down securely to my Saunders Waterford paper with Bindex, a wonderful product that I have only just discovered and glues all manner of materials brilliantly. I followed that with Daniel Smith watercolour ground (one of my favourite products) to both knock back the collage and add texture to the surface, applied with a palette knife.
(Difficult to see in this photograph but I'm sure you get the gist...)
3. I drew out my composition on to the surface (once it was dry) firstly using Tracedown and then adding lots of detail freehand, making sure that the pencil element was going to provide me with a map that will guide my painting.
4. I really enjoy starting off a mixed media piece with water soluble pens to provide a type of under painting before I start with the paint. Here I used Stabilo .68 and .88 pens in black and grey, then sprayed them with water to give a diffused effect.
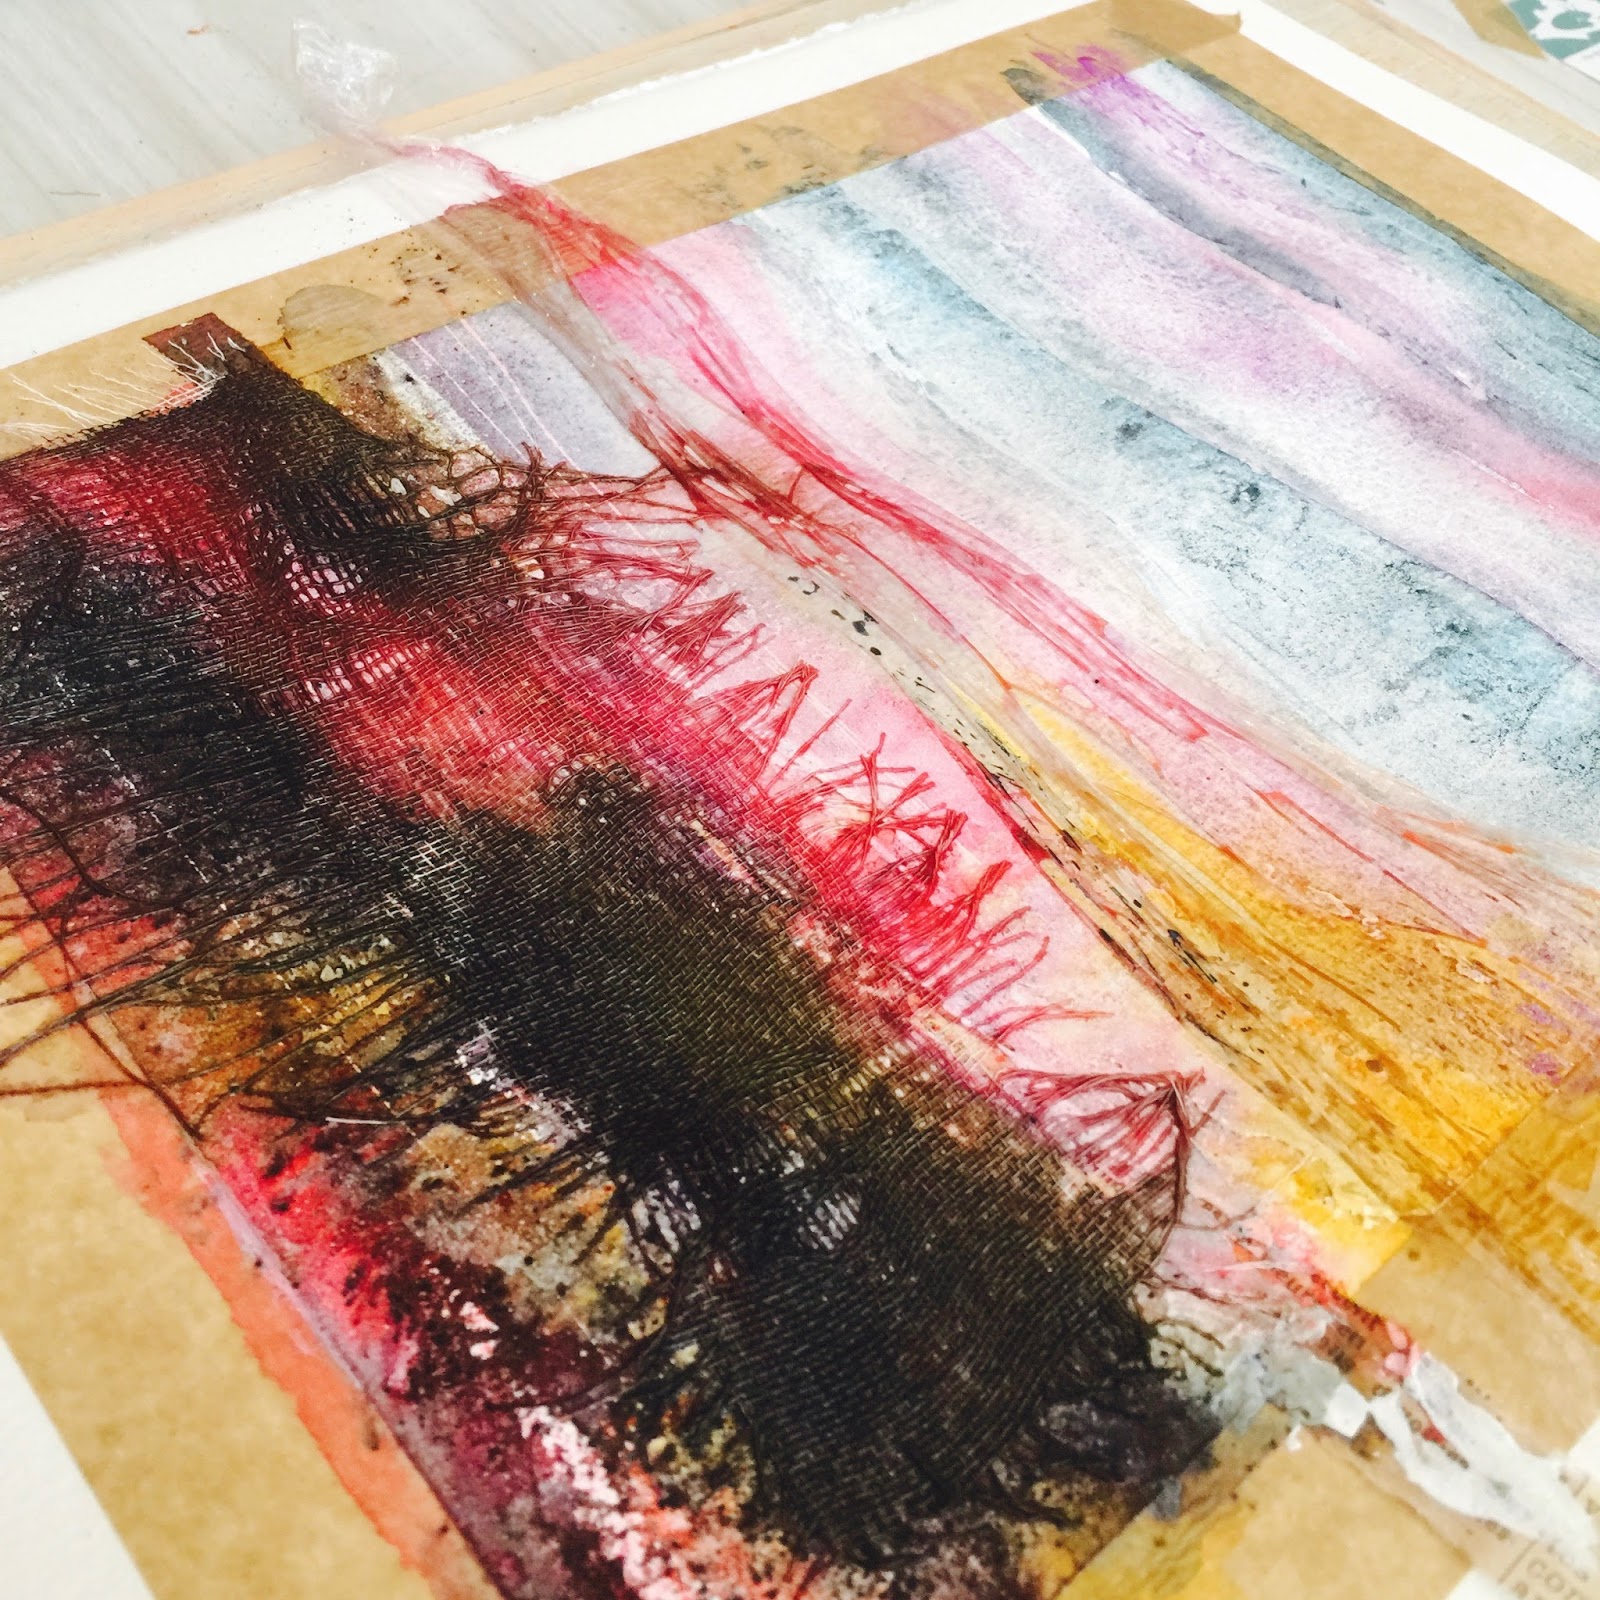
5. Now the best part - crack open the paints!! As the walls of Venice are riddled with texture and interesting stucco finishes, I thought that it might be fun to incorporate cling film technique so I used Daniel Smith's Italian Venetian Red (obviously) with Lunar Blue so that they would granulate under the film.
6. After removing the cling film and going back in with more paint to strengthen the colour, I worked on the shadows, the glass and the pillars with combinations of Cerulean, Cobalt Turquoise and the previous two colours.

7. Finishing off a piece is always the dangerous part for me - which techniques or materials will I use and will I get in to trouble by including too much? Here I made a few alterations by incorporating a little more pen, white gouache and a few flashes of Inktense pencil for good measure.
The photographs don't really do the piece justice as the colours are brighter and I didn't get a chance to edit them but you get the idea....
You are welcome to use the photograph as reference, I took it myself and would love to see anything you create with it. I hope this guide gives you a little inspiration and the confidence to try out some of the techniques. Happy Painting all of you, Ali